Security Professional
Overview
Security issues for Magento have left a big question mark in the community of online stores. This problem is specially cared when Magento-based stores which own critical information and huge transactional volume can easily become ideal prey for blackhat hackers to attack. To help online stores prevent brutal break-ins, Mageplaza has developed the Security extension. Magento 2 Security extension gives store owners the ability to detect the IP addresses that are intentionally attacking their store at any given time. Therefore, they have timely measures to prevent this issue such as blocking those IP addresses or sending warning emails to store owners.
Security Professional grants store owners the ability to forbid all login attempts at a period of time, which is called Away Mode. Furthermore, they can keep track and spot out all changed files, activities of other admin users as well as back up logs for the record purpose.
How to use
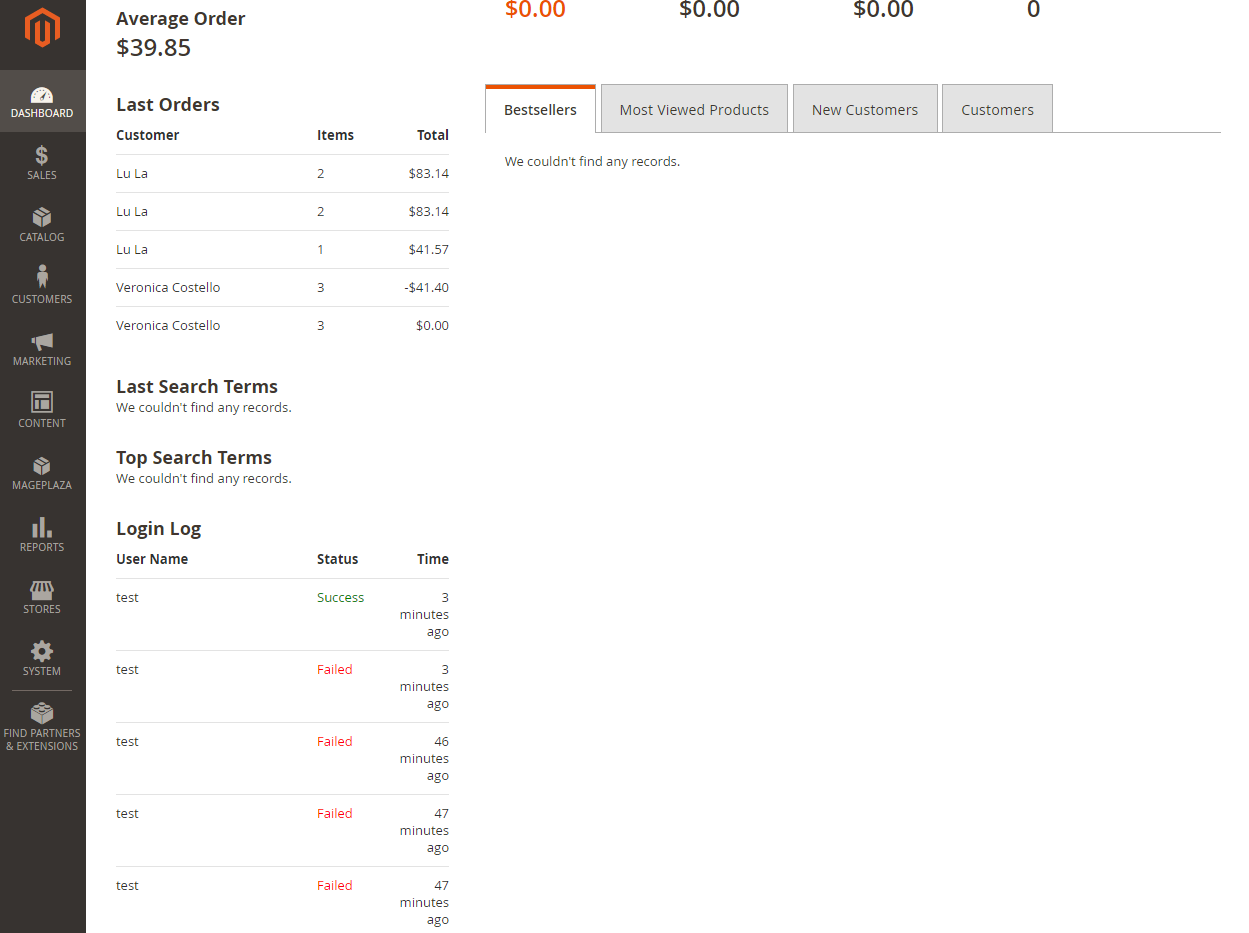
You can review login records from the dashboard when entering the backend. The log displays the newest 5 logins and you can click on the login name to view the details.
How to configure
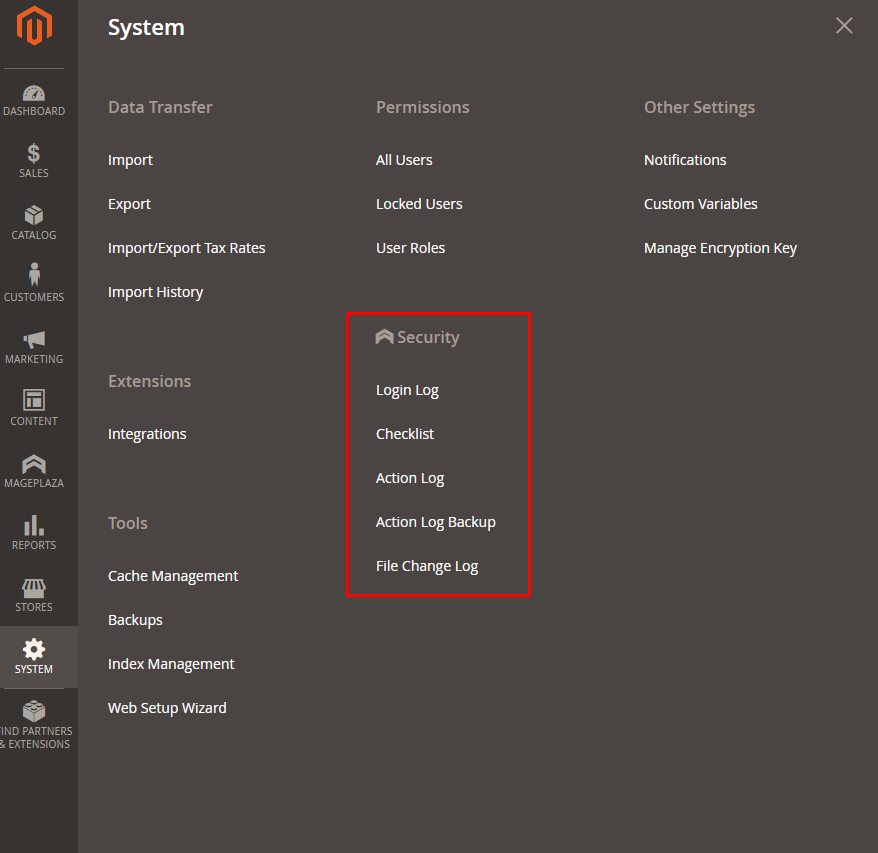
After logging in Magento backend, go to System > Security. We will provide detail guides to these bellow configuration
- Login Log
- Checklist
- Action Log
- Action Log Backup
- File Change Log
I. Configuration
1.1. General
After entering Store > Settings > Configuration > Mageplaza Extensions > Security, expand the General configuration

- In the Enable field: Choose “Yes” to turn the Security module on.
- In the Send warning emails to field:
- Enter the email address to be able to receive warning emails.
- You can fill multiple emails separated with commas
,
1.2. Brute Force Protection
Follow System > Security > Configuration > General > Brute Force Protection
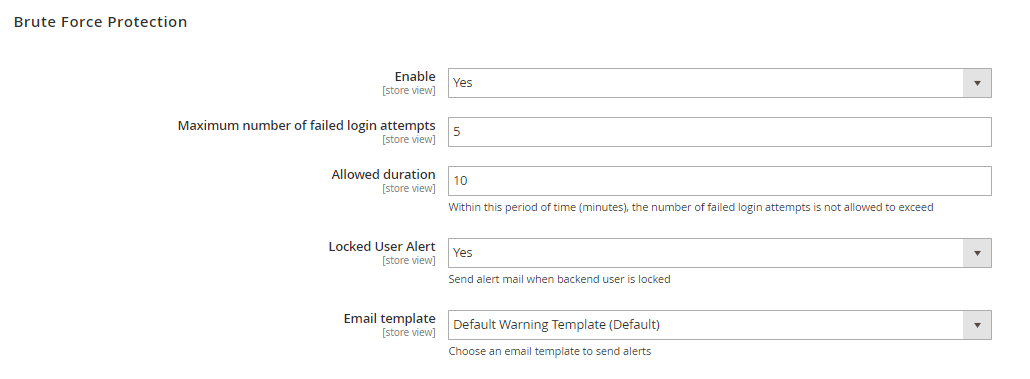
- In the Enable field: Choose "Yes" to enable this function.
- In the Maximum number of failed login attempts field:
- Enter an allowable number of failed logins.
- Default number of maximum failed login attempts is
5when you enable Security module. - If you leave it blank or enter 0, after a failed login happens, an email will be sent.
- In the Allowed Duration field:
- Enter the number of minute(s) which presents the length of a session. During this session, If the Maximum number of failed login attempts is reached, warning emails will be sent.
- Default number of allowed duration is
10minutes when you enable Security module. - If you leave the field blank or enter 0, no warning emails will be sent even if the maximum number of acceptable logins is reached.
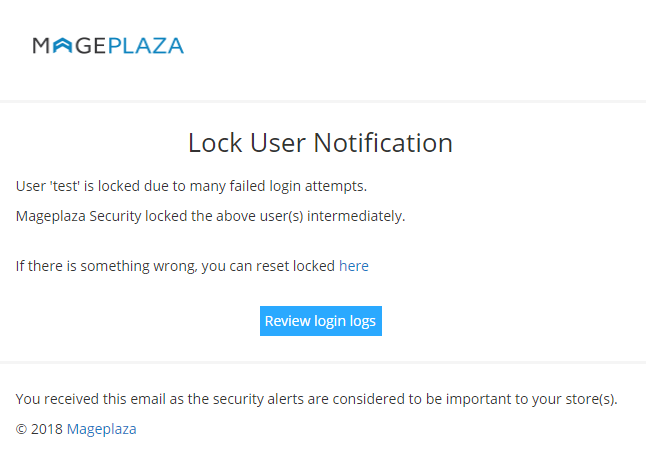
- In the Locked User Alert field: Select "Yes" to send the alert email when the admin account is locked due to failed login attempts is exceeded.
- In the Email Template field:
- Choose the template for the warning email.
- You can edit/customize one at
Marketing > Email Template.
Here’s an example of a warning emails:

1.2. Blacklist/Whitelist IPs

- In the Blacklist(s) field:
- All IP addresses filled in this section will be blocked whenever accessing the admin login page.
- You are able to block one IP address, multiple IP addresses, an IP address range or multiple IP address ranges. IP addresses are separated with commas
,. - You can also block IP addresses as wildcard masks as below:
10.0.0. *10.0. *. *10.0.0. * - 123.0.0. *12.3. *. * - 222.0. *. *
- The mark
*is in the0 - 255range.* - In the Whitelist(s) field:
- All IP addresses that are filled in this section will be allowed whenever accessing the admin login page.
- You can allow one IP address, multiple IP addresses, an IP address range or multiple IP address ranges. IP addresses are separated with commas
,. - You can also allow IP addresses as wildcard masks as these follows:
10.0.0. *10.0. *. *10.0.0. * - 123.0.0. *12.3. *. * - 222.0. *. *
- The mark
*is in the0 - 255range.* - To learn how to reset Blacklist/Whitelist IPs, please refer this Reset command lines
Blacklist(s) has higher priority than Whitelist(s) which means if a IP address is in the Blacklist, it will be blocked even it's in the Whitelist as well. So please make sure that you add your IP address in the Whitelist only.
1.3. Action Log Backup
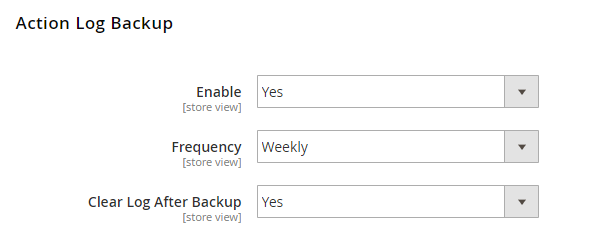
- In the Enable field: Choose "Yes" to back up the Action log.
- In the Frequency field: Choose one of avalable time options
- Frequency = Daily: Action log will be backed up daily.
- Frequency = Weekly: Action log will be backed up weekly.
- Frequency = Monthly: Action log will be backed up monthly.
- In the Clear Log After Backup field: Select "Yes" to clear the log in Action Log after the log has been backed up.
1.4. Amway Mode
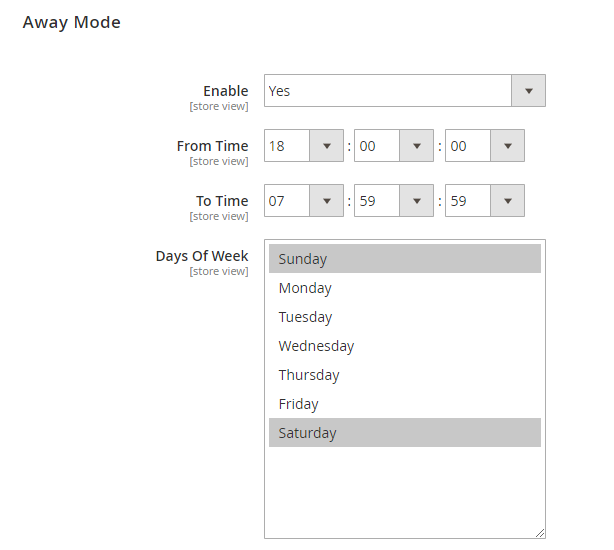
- In the Enable field: Choose "Yes" to forbid all login attempts in this configured time.
- In the From Time field: Choose the start time you want to set Away Mode.
- In the To Time field: Choose the end time you want to set Away Mode.
Away Mode time will be set between "From Time" and "To Time". Other admin users can't access backend in this period.
- In the Day of Week field:
- You can select to forbid some specific the whole day(s) weekly.
- You can select multiple days.
- To learn how to reset Away Mode, please refer this Reset command lines
Configured Away Mode time will follow the store's timezone.
1.5. File Change
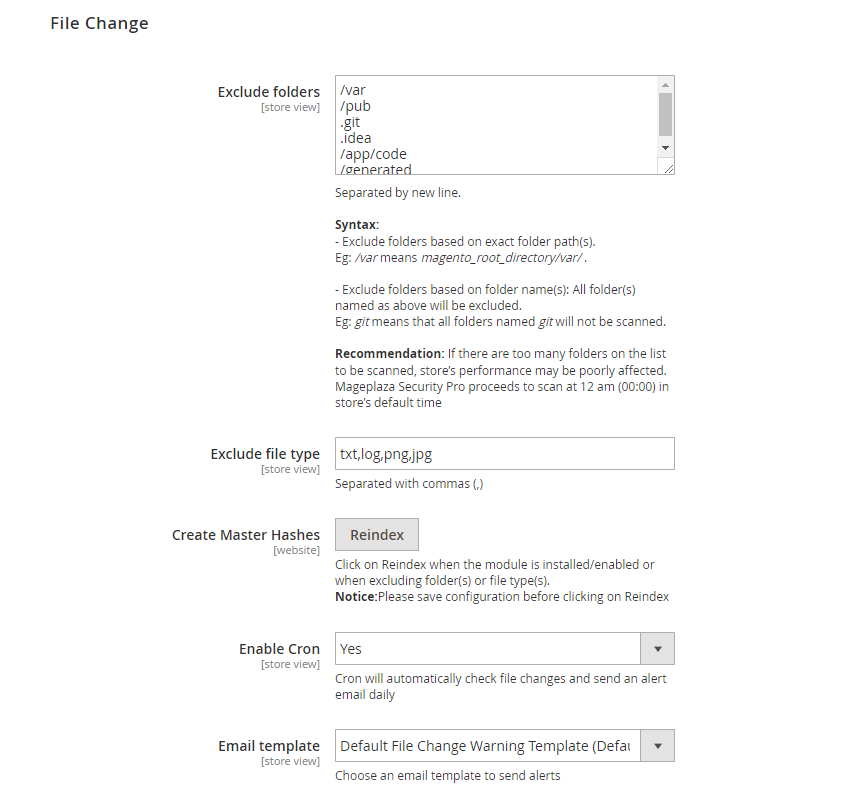
- In the Exclude folders field: This will exclude folders which are
- Paths have
/at the start is permanent links. E.g: /var means magento_root_directory/var/ - If paths don't have
/at the start line, all folders having entered name in this field will be excluded. E.g: all folders named git will be excluded. - Normally, folders which can't be accessed from the store frontend should be excluded.
- Paths have
- In the Exclude File Type field:
- Entered file types will not be scanned to keep track possible changes.
- You can enter multiple file types separated by commas
,.
- In the Create Master Hashes field:
- Important note: You must click
Save Configbefore proceeding to clickReindexbutton, to prevent the directory or files added, modified, deleted to be automatically converted the file type into Deleted status. - When Security module is turned on/off, or when new folders/files have been added to the system, you should click
Reindexbutton to scan all the files again.
- Important note: You must click
- In the Enable Cron field:
- Choose "Yes" to turn on the send email function while running Cronjob.
- After being run the Cronjob program, changed files will be backed up.
- In the Email Template field:
- Choose the template for the File Change Notification email.
- You can edit/customize one at
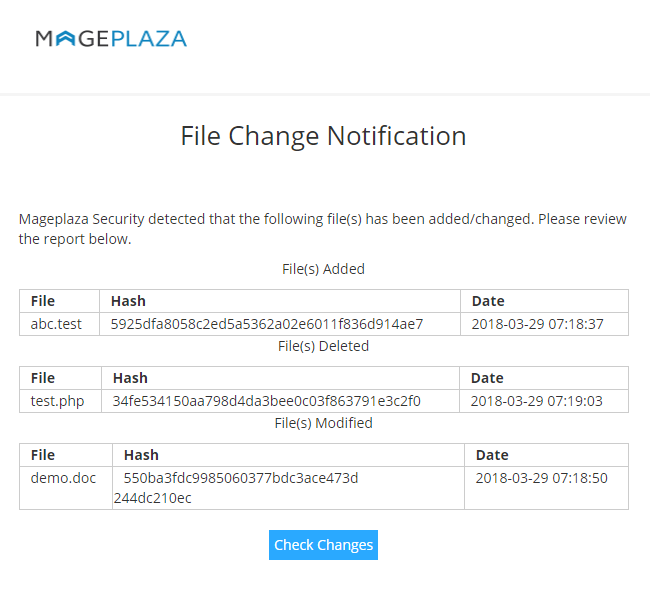
Marketing > Email Template. To see how the File Change Notification looks like, please check this below image
II. Login Log
From the admin panel, make your way to System > Security > Login Log. All logins and login attempts will be recorded here. Click on the Clear All button to remove all the records of Login Log.
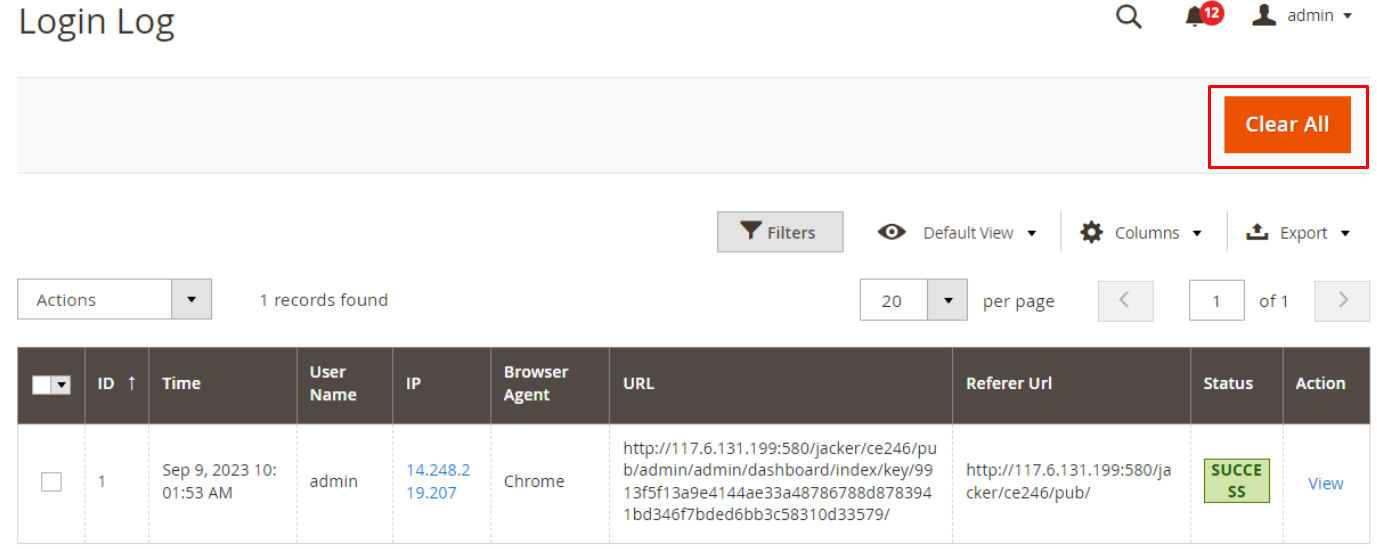
Click View to see login details. Here’s an example:

- Once an admin account has exceeded the allowed login attempts (which is configured at
Store> Settings> Configuration> Advanced> Maximum Login Failures to Lockout Account), there will be a mail notification to the store owner that this account has been lock up. Store owner should review this case again to reset safety settings. You can refer this article to learn how to unlock an admin user account.
- Also, store owners can check the last login of a specific administratore. You can follow
System > Permissions > All Users
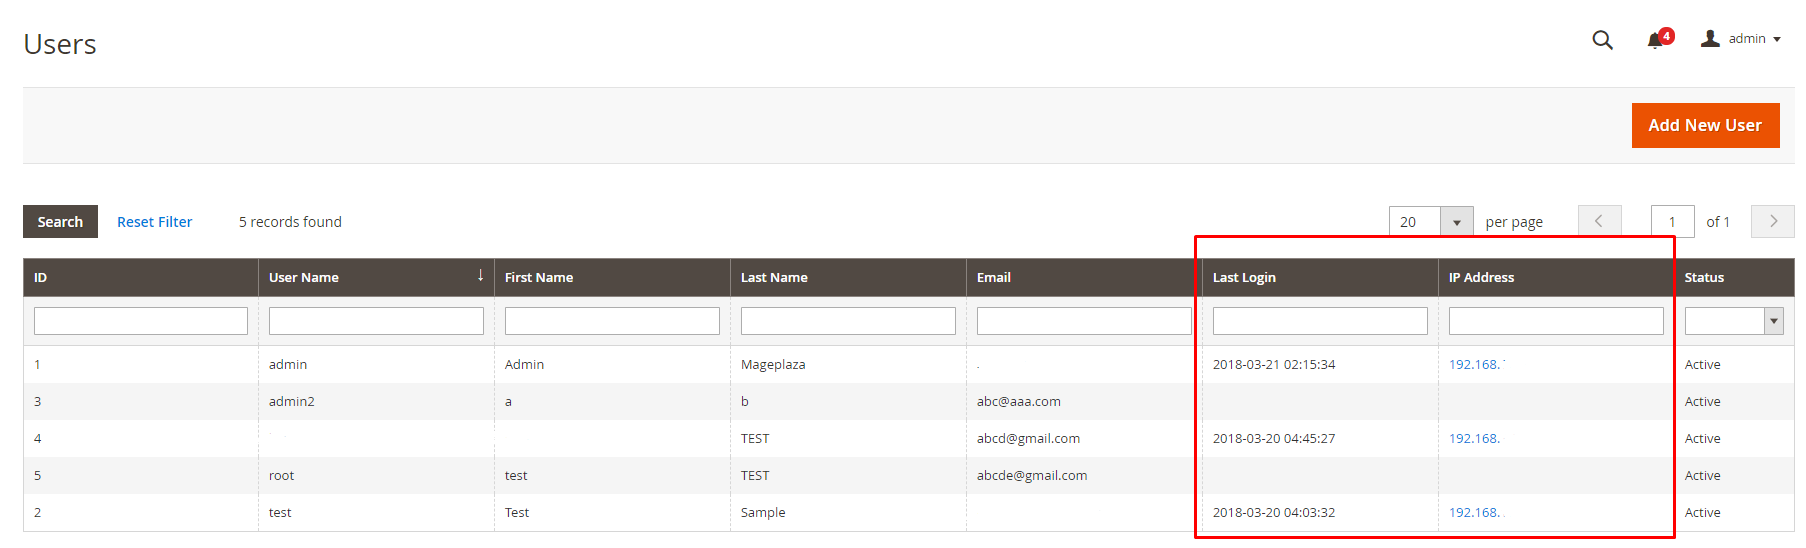
- The Last login column records the newest recent login attempt of an admin.
- The IP Address column records the IP address corresponding to the newest recent login attempt of an admin. Clicking on an IP address, it will redirect to the Traceip page.
III. Checklist
Checklist is a bunch of outlines pointing out which factor(s) can be the possible vulnarablity for your stores. Go to System > Security > Checklist
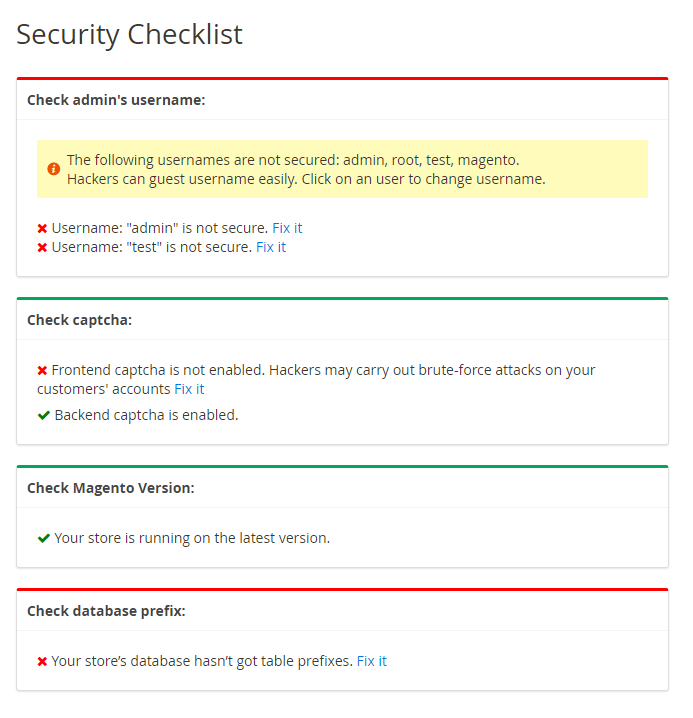
- In the Check admin's username box:
- Check the name of the admin account, if the default name is too obvious to guess or popular to name, the message will alert the store owner.
- Click Fix it to be redirected to the Edit User page
- In the Check captcha box
- Check if captcha is enabled outside the frontend or in the backend.
- Notify if store owner has enabled captcha. If not, message will warn store owner to enable captcha.
- Click to Fix it, CAPTCHA will be enabled automatically and the confirmation message will be delivered.
- In the Check Magento Version box:
- Check the version of Magento that the store owner is using. If this is not the latest version, the checklist will alert store owners to update to the latest version.
- Click to Fix it to be redirected to the Update version guidance.
- In the Check database prefix box:
- Check if the store owner has used the database prefix or not. If not, the checklist will alert store owners to use them for database security.
- If the store owner uses a database prefix, the checklist will notify them that their database is working properly.
- Click Fix it to display the Add table prefix, enter the table prefix name to add them.
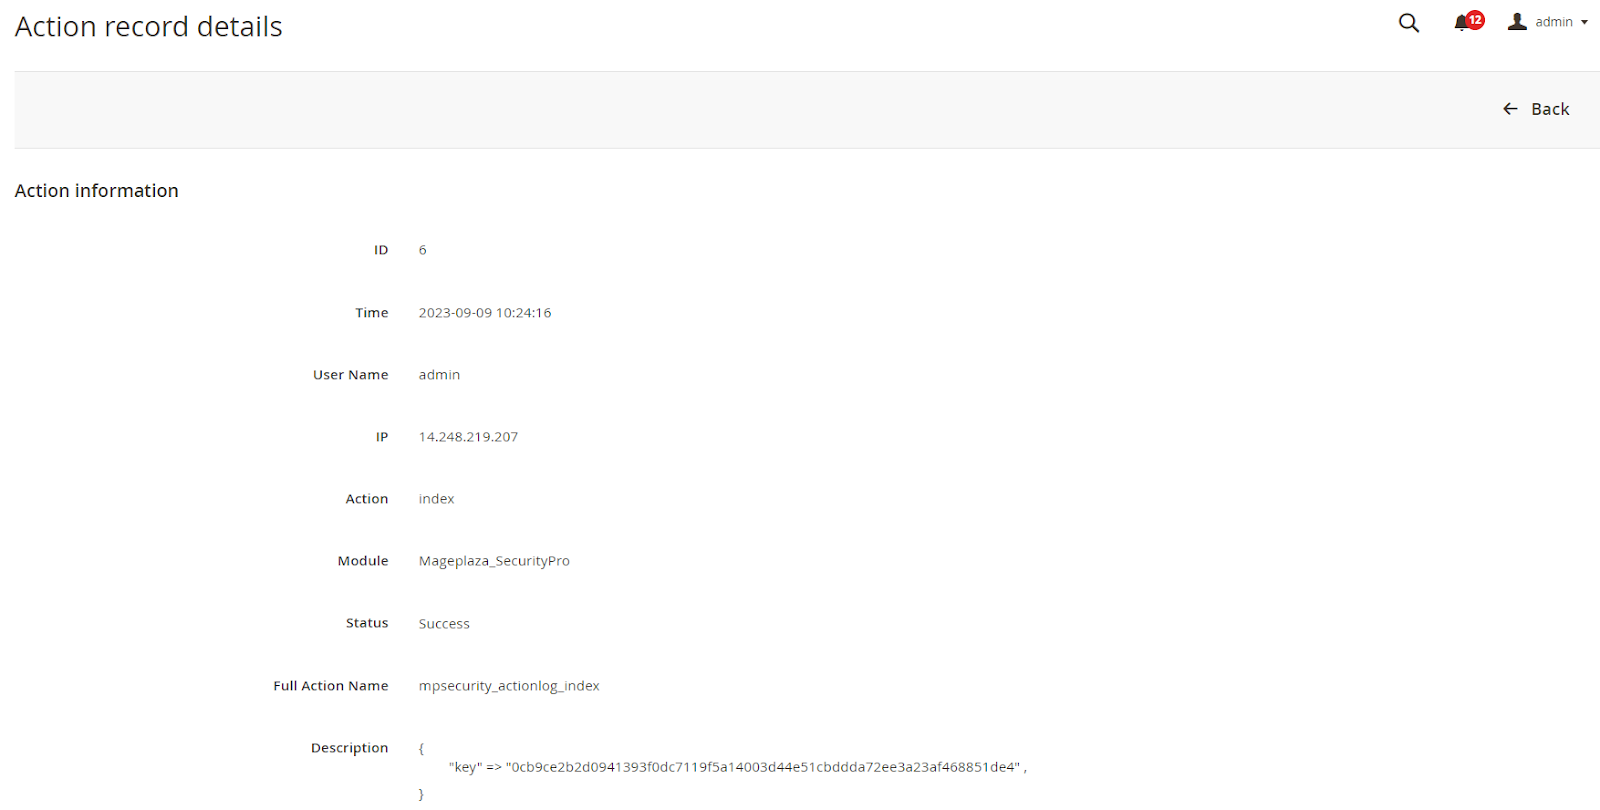
IV. Action Log
From the admin panel, go to System > Security > Action Log
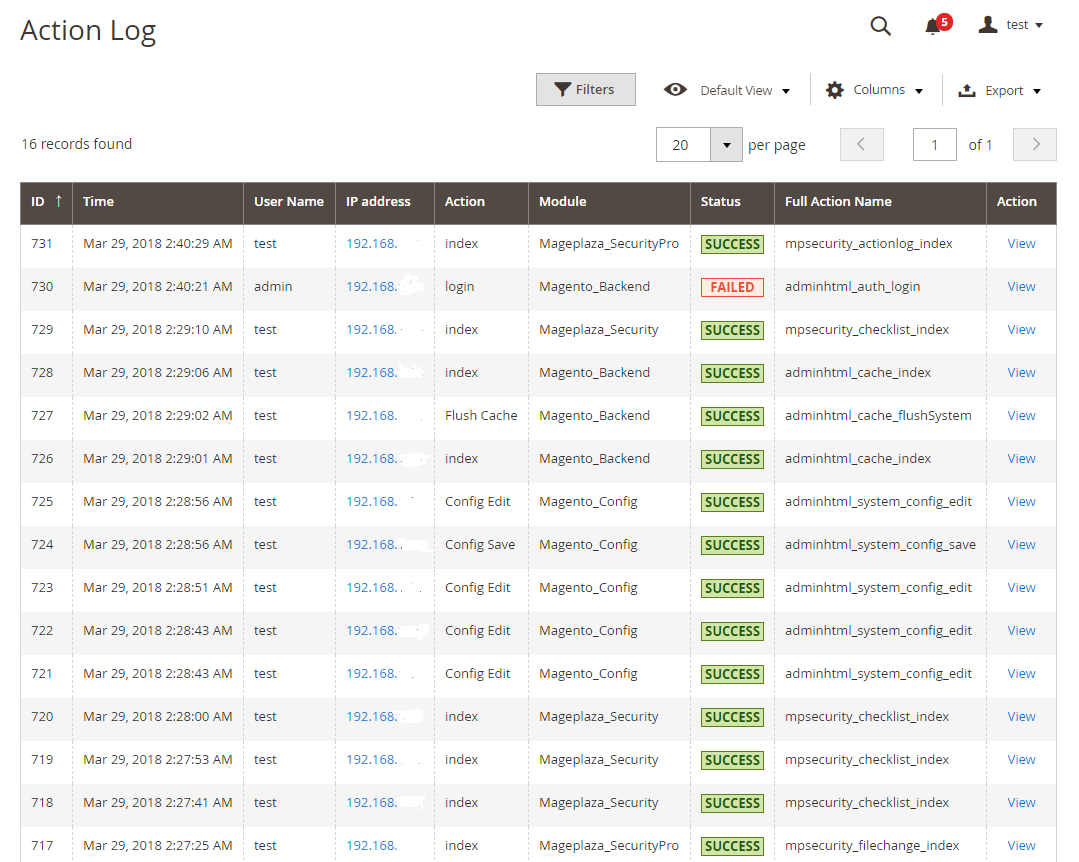
Here records all the actions of admin users when they logged into the admin page. Clicking on any IP address will redirect the store owner to the Trace IP page. Click View to display detailed information of that log. All logs at this directory will be deleted if the store owner chooses to delete the log after the log has been backed up.
V. Action Log Backup
You can go to System > Security > Action Log Backup.
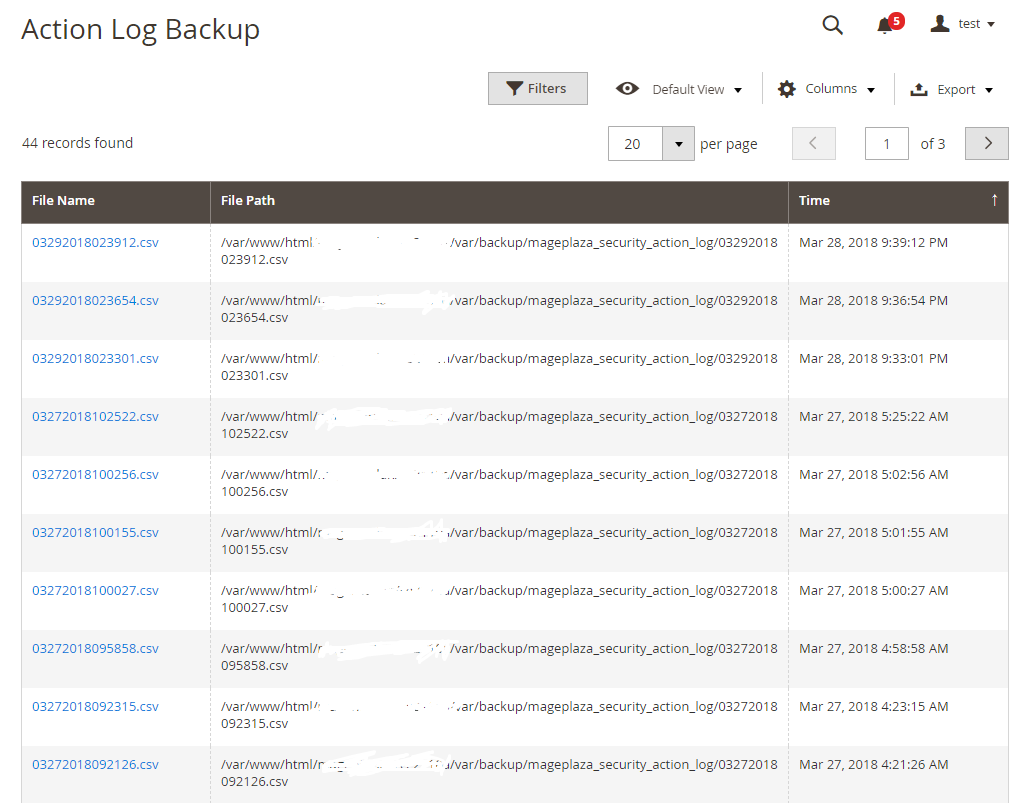
In this section, all logs in the Action Log are automatically backed up as a csv file. Clicking on any file will automatically be downloaded.
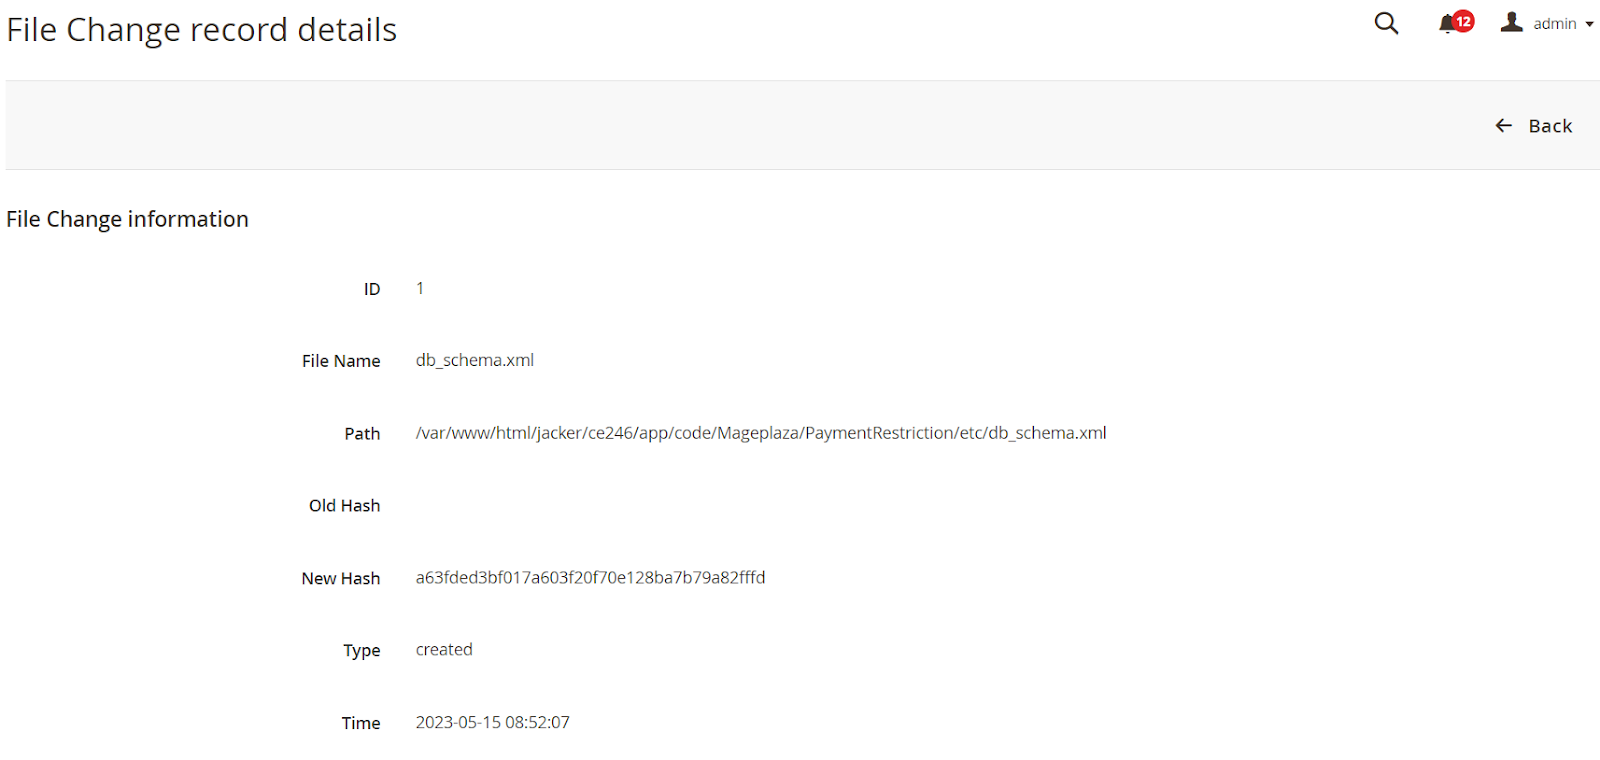
VI. File Change Log
Please check at System > Security > File Change log
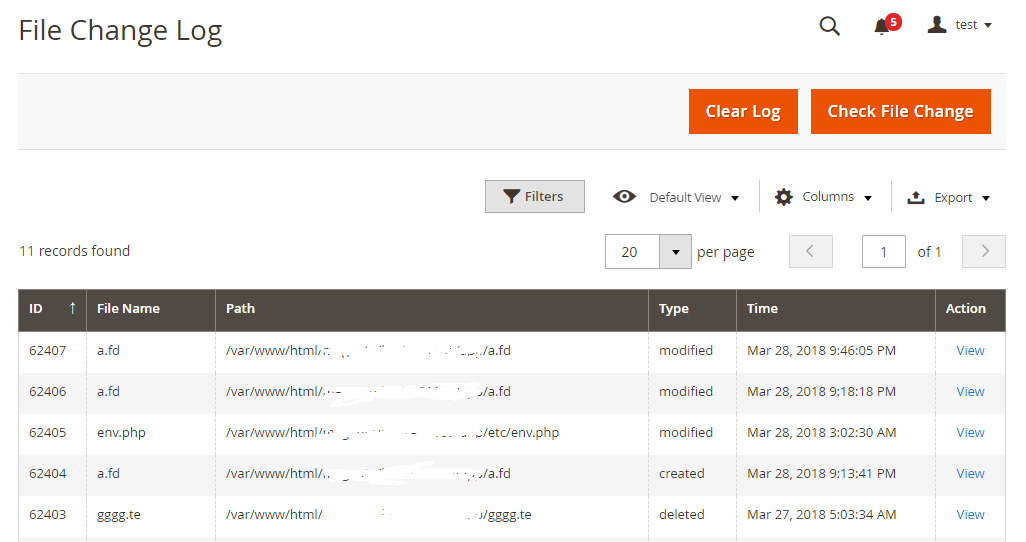
This section records all created, modified, deleted files. All files are scanned and recorded daily at 0:00 PM according to the store's configuration time and automatically. Email alert will also be sent to the store owner about the change of files. Clicking View to display information for the log.
When the store owner clicks on Check File Change, it will check whether the current has been modified, created or deleted instead of waiting until 00:00. If there are too many recorded logs that the store owner does not want to store anymore, they can click on Clear Log to clear all the logs are stored here
How to Configure Two-Factor Authentication
1. Configuration
From Admin panel, go to Stores > Configuration > Mageplaza > Two factor Authentication
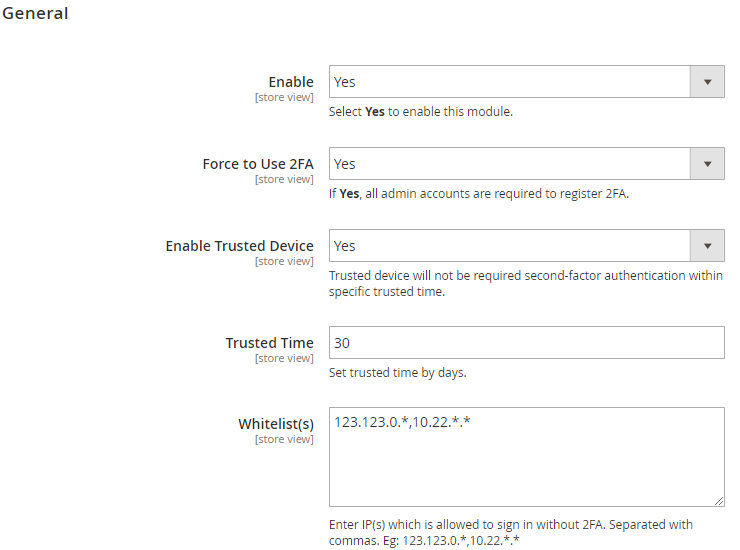
Enable: Select
Yesto activate the moduleForce Using 2FA:
- Choose
Yesto force all admin users to register Two-Factor Authentication (2FA). If the account logged in has not yet installed 2FA in the account setting, it will be linked to the Account setting page for installation - When 2FA is enable, all admin users who have not registered 2FA must go to My Account page to set it up. After that, they can access others admin pages
- Choose
Enable Trusted Device:
- Select
Yesto enable saving the trusted devices. In a certain period of time, when logging in with this device, admin users do not need to authenticate the two factors - This certain period is configured at Trusted Time field
- Select
Trusted Time:
- During the time period set in this section, when logging in with this device, the admin users do not need to authenticate two factors.
- When changing Trust time, the previously saved devices also change the trust time accordingly
- Time is set by day
Whitelist(s):
- Only the IP addresses filled in this section can access the Dashboard page without 2FA (even if not in the Trust Device List)
- It is possible to allow 1 IP address, multiple IP addresses, 1 range of IP addresses or multiple IP address ranges to have access to admin. IP addresses are separated by commas
- The owner can also allow IP addresses to be accessible to admin pages without authenticating 2FA in the following form: 10.0.0.10, 10.0.0. , 10.0. . , 10.0.0. - 123.0.0. , 12.3. . - 222.0. . Symbol "" in range 0 - 255
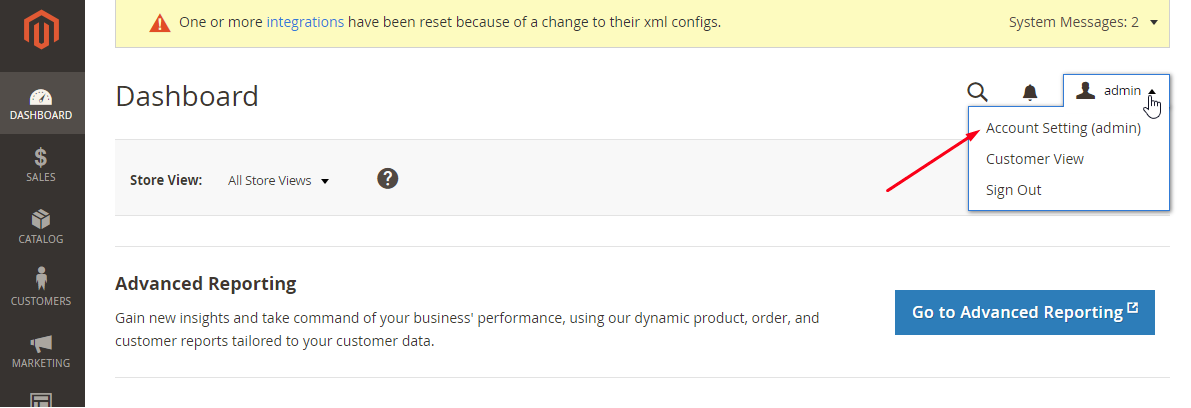
2. My Account Admin
Admins need to go to Account Setting to set QR/Pin code
Register 2FA:
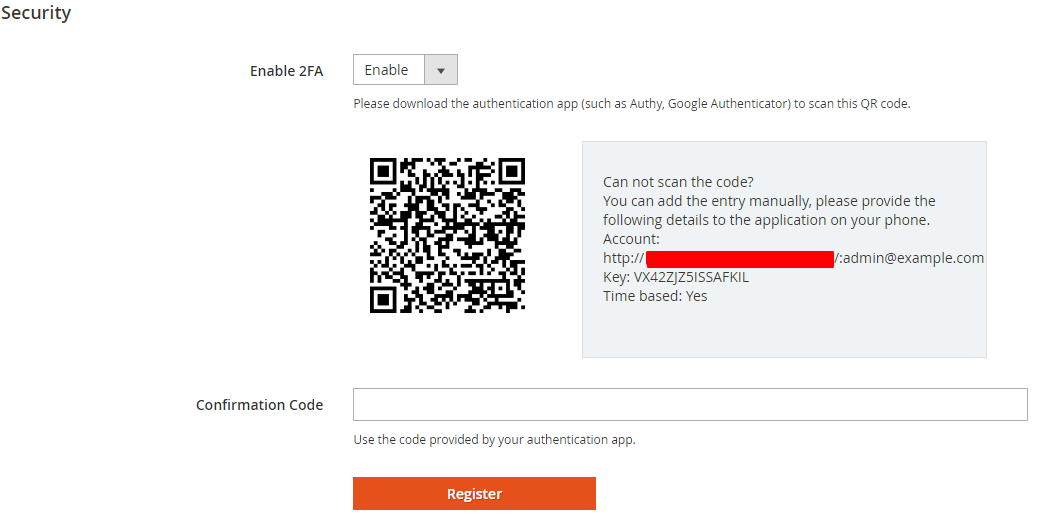
- After enabling 2FA, admins need to use the Authy app or Google Authenticator on the phone to scan the QR code or enter the Key into the app to get the confirmation code.
- After QR code is saved in the app, it automatically generates confirmation code. Admin needs to get that code and enter the it to register
- After registering, from the next login, admins need to get the code from the app to verify so that they can access the dashboard
- The confirmation code created by the app after being replaced 30s still works for verification
- When Force using 2FA is enabled, the admin user cannot disable 2FA here
Check and remove Trusted Devices:
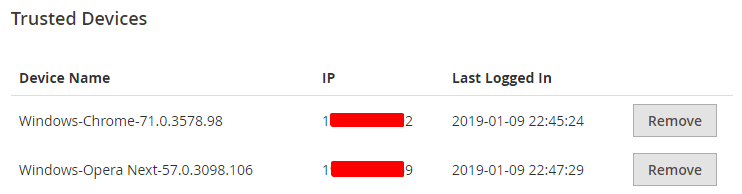
- Log the browser on the machine with certain IPs that can be trusted and the last time the user logs in with this browser
- When the enable trust device, in the trust time period, the devices saved here will not need to enter the confirmation code to log on.
- Over time of trust time, device will be automatically removed from the list
- User admin can also remove that period by clicking the
Removebutton
3. Disable login with 2FA by command
In case you cannot get the confirmation code to log in with 2FA, you can use the following command to disable this feature with your account.
php bin/magento mageplaza-2fa:reset{{admin_username}}
For example, if your admin account has an admin username, then you need to run the command:
php bin/magento mageplaza-2fa:reset admin

After running this command, the 2FA feature will be disabled. If you want to re-enable the feature, you can go to Account Settings to reinstall it according to the instructions in section 2.
4. Frontend & Backend
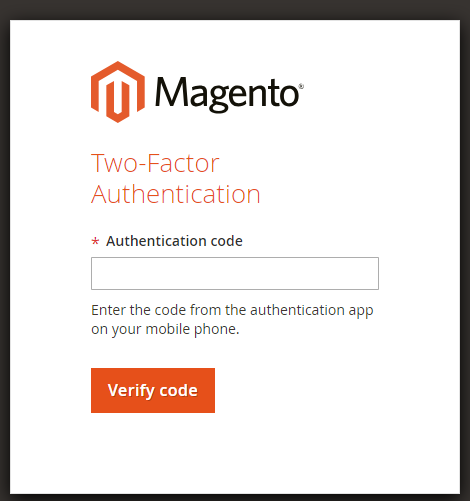
When logging in the backend, admin users need to fill in the authentication factors
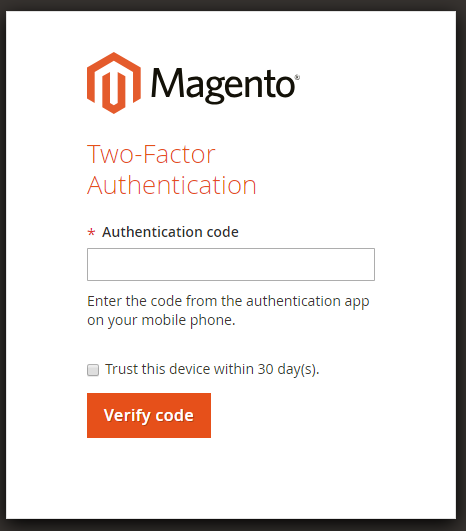
When turn on Trusted Device, authentication request page looks like this:
How to Configure Google reCaptcha
Configuration
General Configuration
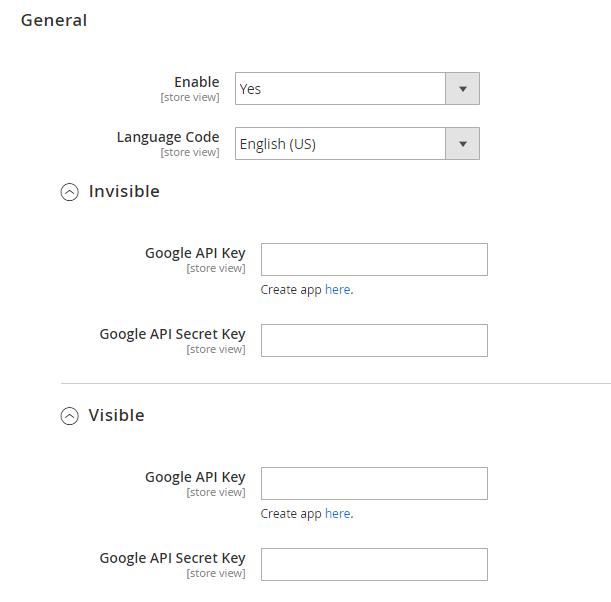
- Enable: Choose Yes to enable this module
- Language Code: Choose the language displaying the reCAPTCHA on the frontend and in the backend
- Invisible
Note: Apply for the frontend
Google API Key: Enter the Key Invisible reCAPTCHA
Google API Secret Key: Enter the Secret Key
How to create reCAPTCHA: Can be found here
Visible
Note: Apply for the backend and frontend
- Google API Key: Enter the Key Visible reCAPTCHA
- Google API Secret Key: Enter the Secret Key
- How to create reCAPTCHA: Can be found here
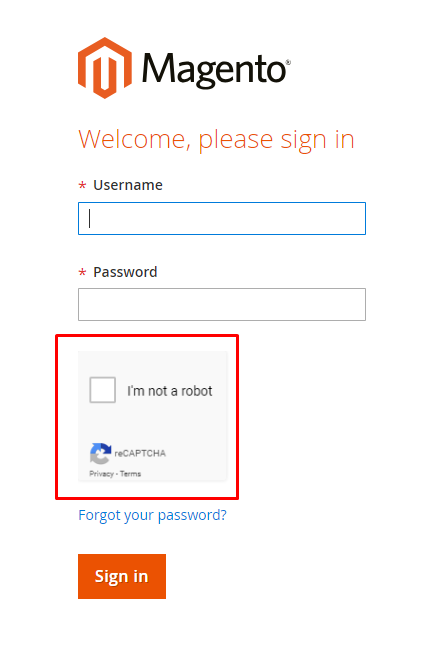
Backend Configuration
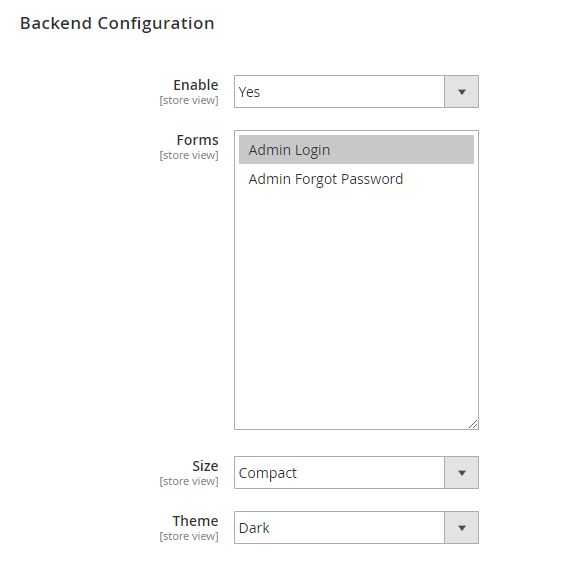
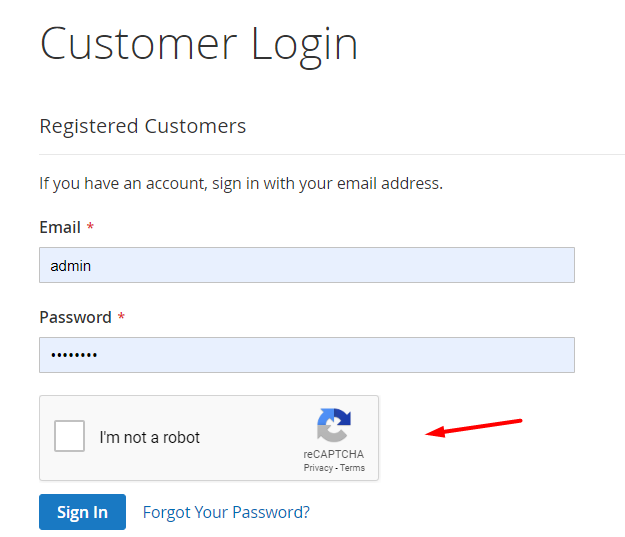
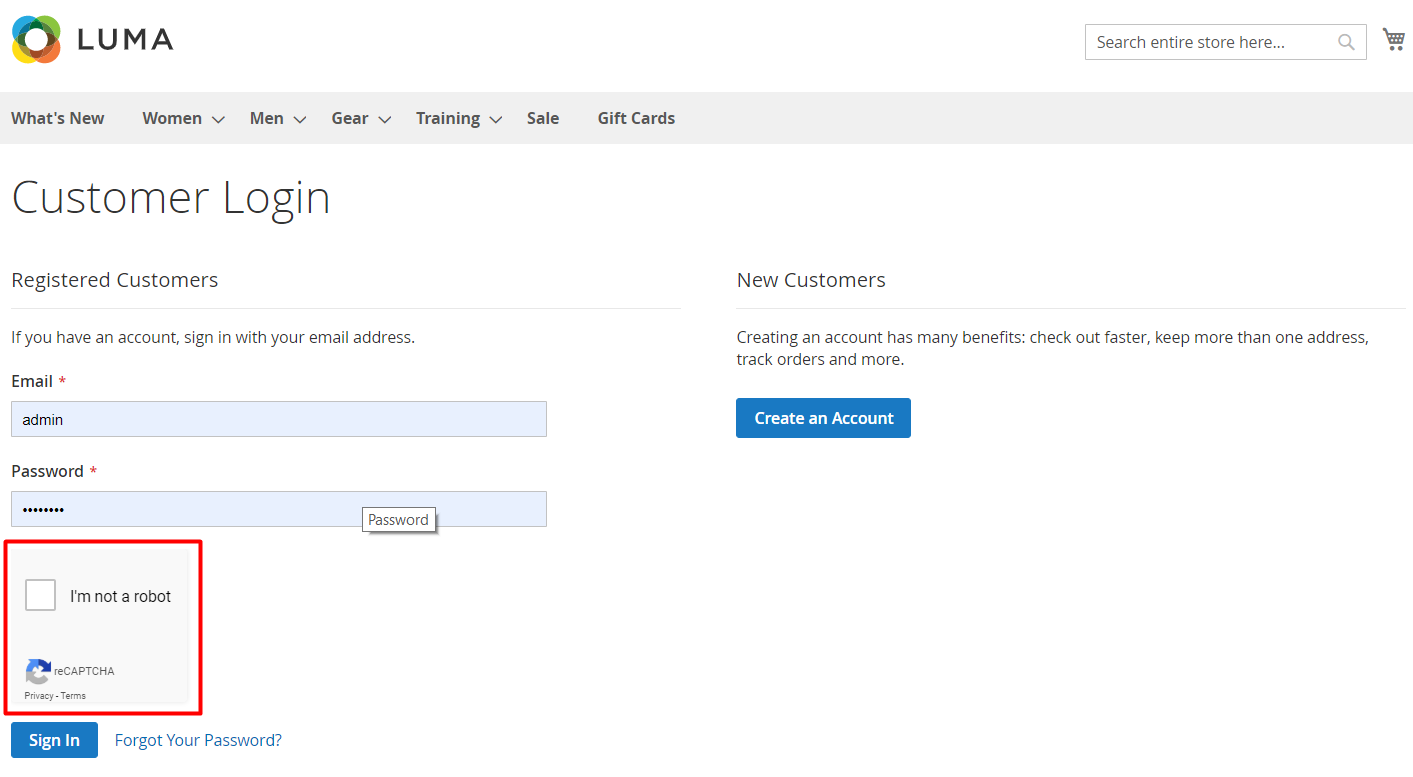
- Enable: Choose Yes to enable reCAPTCHA when accessing the admin panel
- Forms: Choose a place displaying the reCAPTCHA. Store owners can allow reCAPTCHA to display in 2 forms:
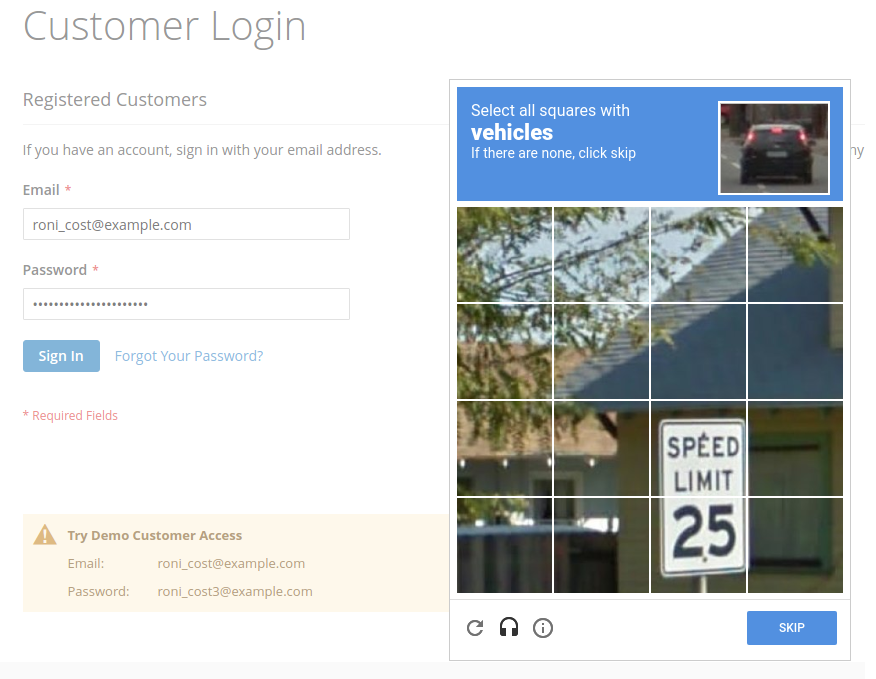
- Forms = Admin Login: reCAPTCHA will display in the Admin Login Form when store owners log into the admin page
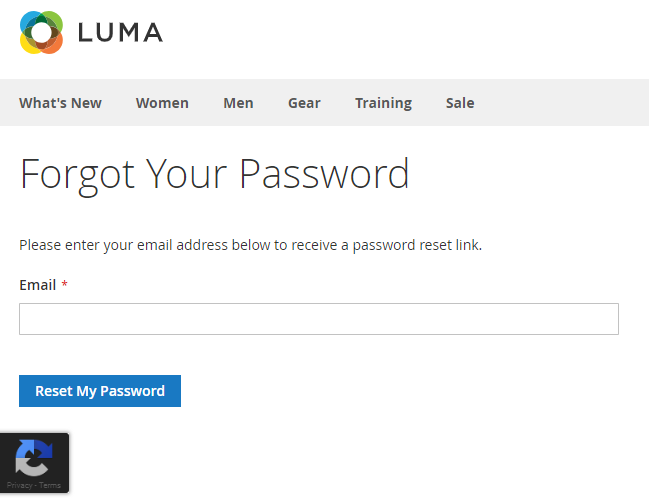
- Forms = Admin Forgot Password: reCAPTCHA will display in the Admin Forgot Password Form when store owners access on the Admin Forgot Password page
- Size: Choose the size to show the reCAPTCHA
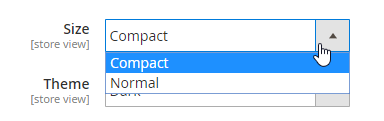
- Size = Compact: reCAPTCHA will display as the following image:
Size = Normal: reCAPTCHA will display as the following:
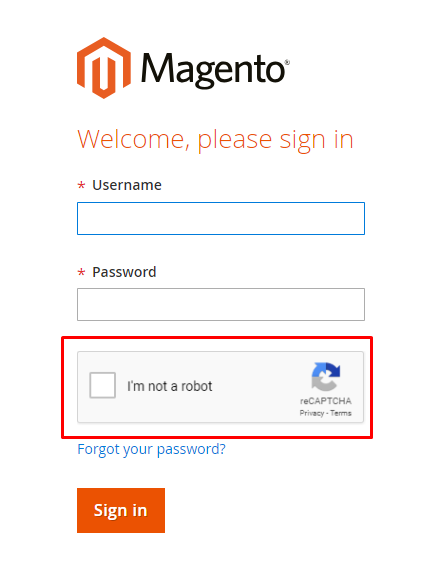
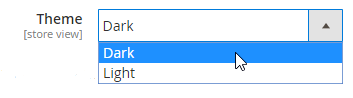
Theme
- Theme = Light: reCAPTCHA will display the light color
- Theme = Dark: reCAPTCHA will display the dark color
Frontend Configuration
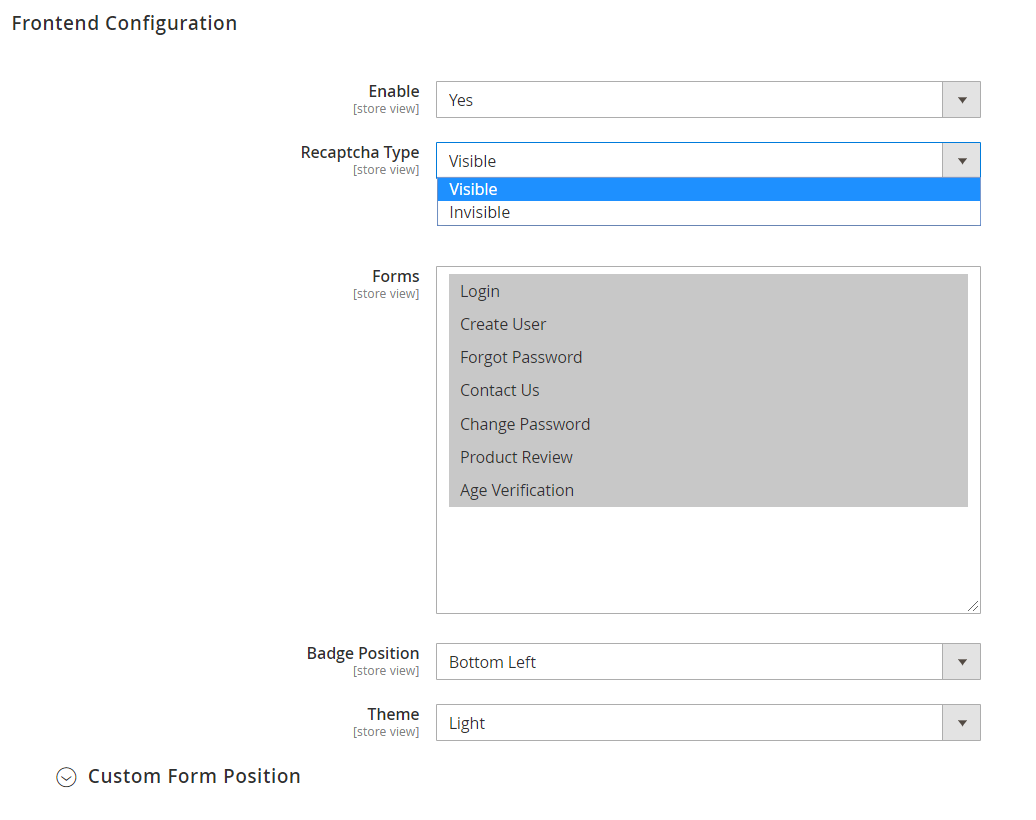
- Enable: Select Yes to display reCAPTCHA on the frontend
- Recaptcha Type: Show Recaptcha at Frontend with 2 types:
- Visible: Show Visible Recaptcha at Frontend
- Invisible: Show Invisible raCapcha at Frontend
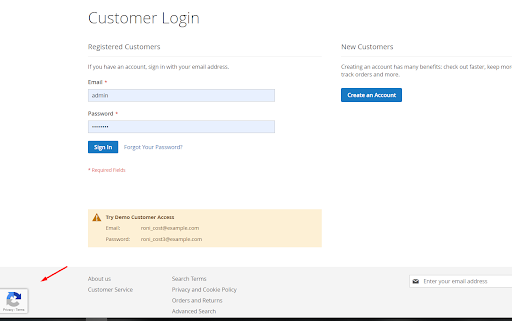
- Visible: Show Visible Recaptcha at Frontend
- Forms: Choose a place displaying reCAPTCHA on the frontend. Store owners can allow reCAPTCHA to display in all forms.
- Forms = Login: reCAPTCHA will show in the Login Form when visitors login to the website
- Forms = Create User: reCAPTCHA will show in the Create User Forms when visitors create an account
- Forms = Forgot Password: reCAPTCHA will show in the Forgot Password Form when customers access the website to get their password
- Forms = Contact Us: reCAPTCHA will display in the Contact Us Form
- Forms = Change Password: reCAPTCHA will show in the Change Password Form
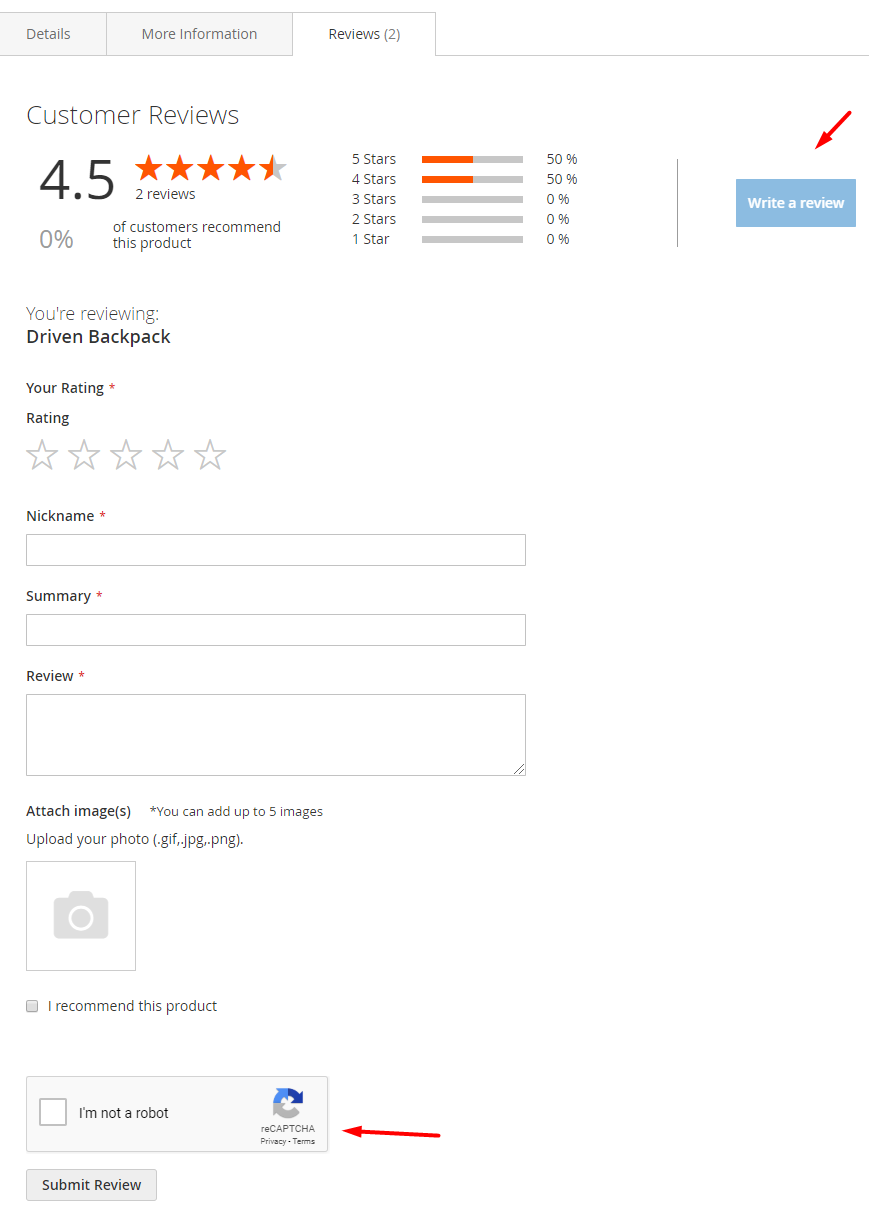
- Forms = Product ReView: reCAPTCHA will display when visitors access the product page to review
- Google Recaptcha is totally compatible with Better Product Reviews extension which supports customers to leave reviews to your product pages easily and accurately. Recaptcha will be shown when you click to Write a review button.
Age Verification: Only show this feature configuration when installing Mageplaza Age Verification extension which supports your store to show reCaptcha at age verification popup.
Badge Position: Show this field when choosing Invisible reCaptcha
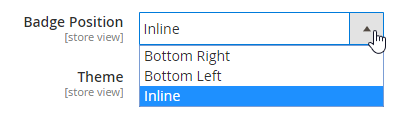
- Badge Position = Inline: Recaptcha will display in the selected form on the frontend
- Badge Position = Bottom Right: Recaptcha will display at the bottom right of the page
- Badge Position = Bottom Left: Recaptcha will display at the bottom left of the page
- Size: Show this field when choosing Visible reCaptcha
- Normal: Show reCaptcha at Frontend as in the following image:

- Compact: Recaptcha is shown at Frontend like this:
- Normal: Show reCaptcha at Frontend as in the following image:
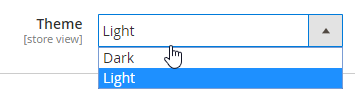
- Theme
Theme = Light: reCAPTCHA will display the light color
Theme = Dark: reCAPTCHA will display the dark color
Custom Form Position: Use this feature to add reCAPTCHA into any form on your store
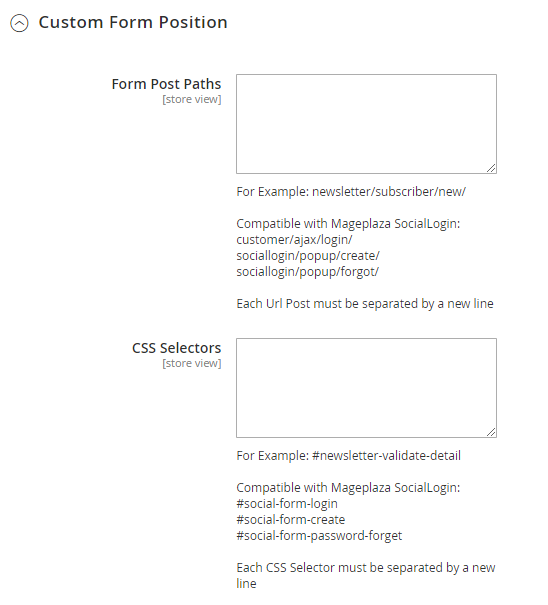
- Form Post Paths
- Enter the path (url) where will process your form information For example: newsletter/subscriber/new/, display reCAPTCHA in the email address field on the website.
Below are some detailed steps:
- Step 1: Login to your website
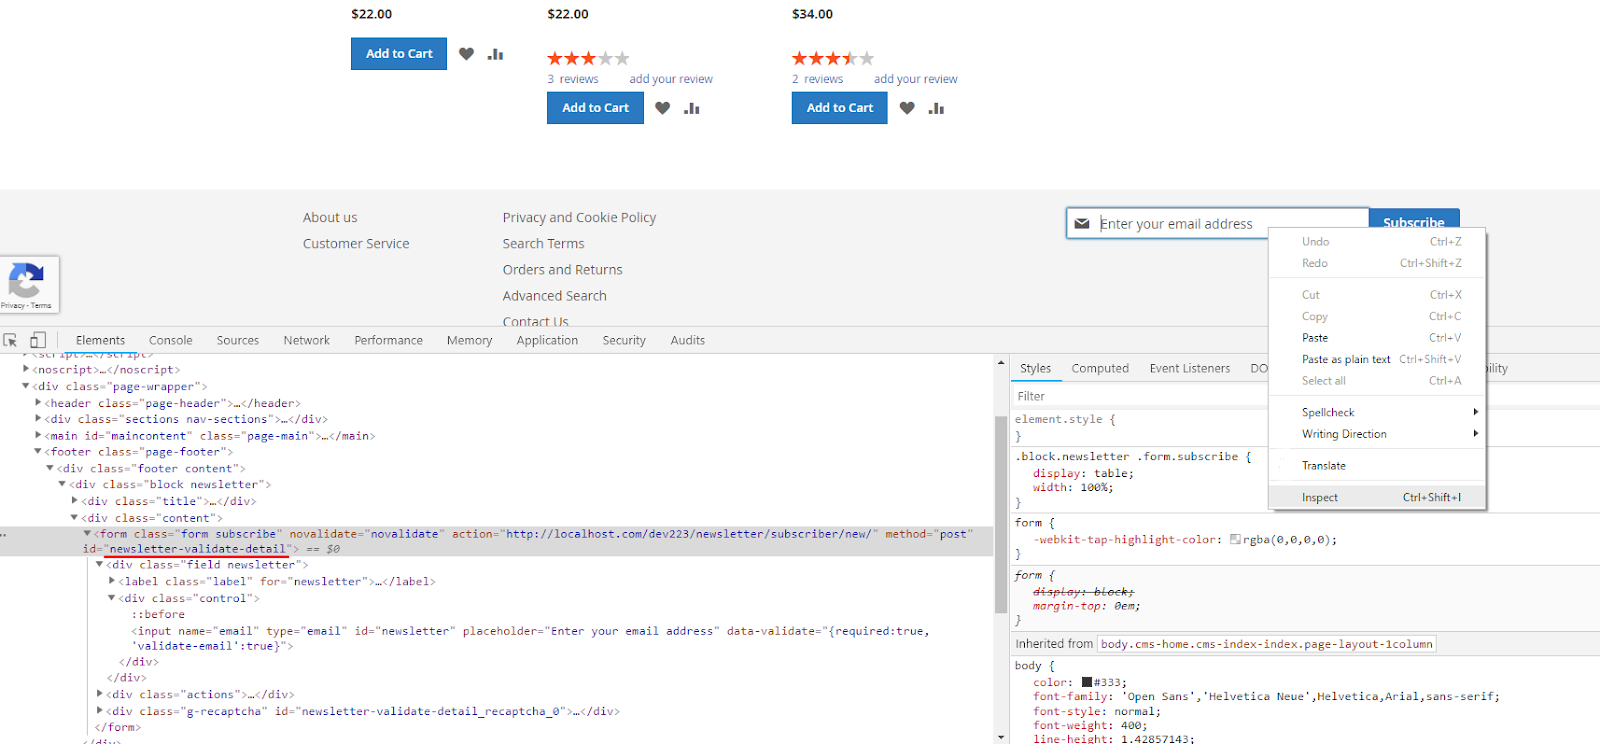
- Step 2: Choose Form that you want to display reCAPTCHA and open the Test window
- Step 3: After that, choose Element tab, then choose the form that contains the field you want to add reCAPTCHA
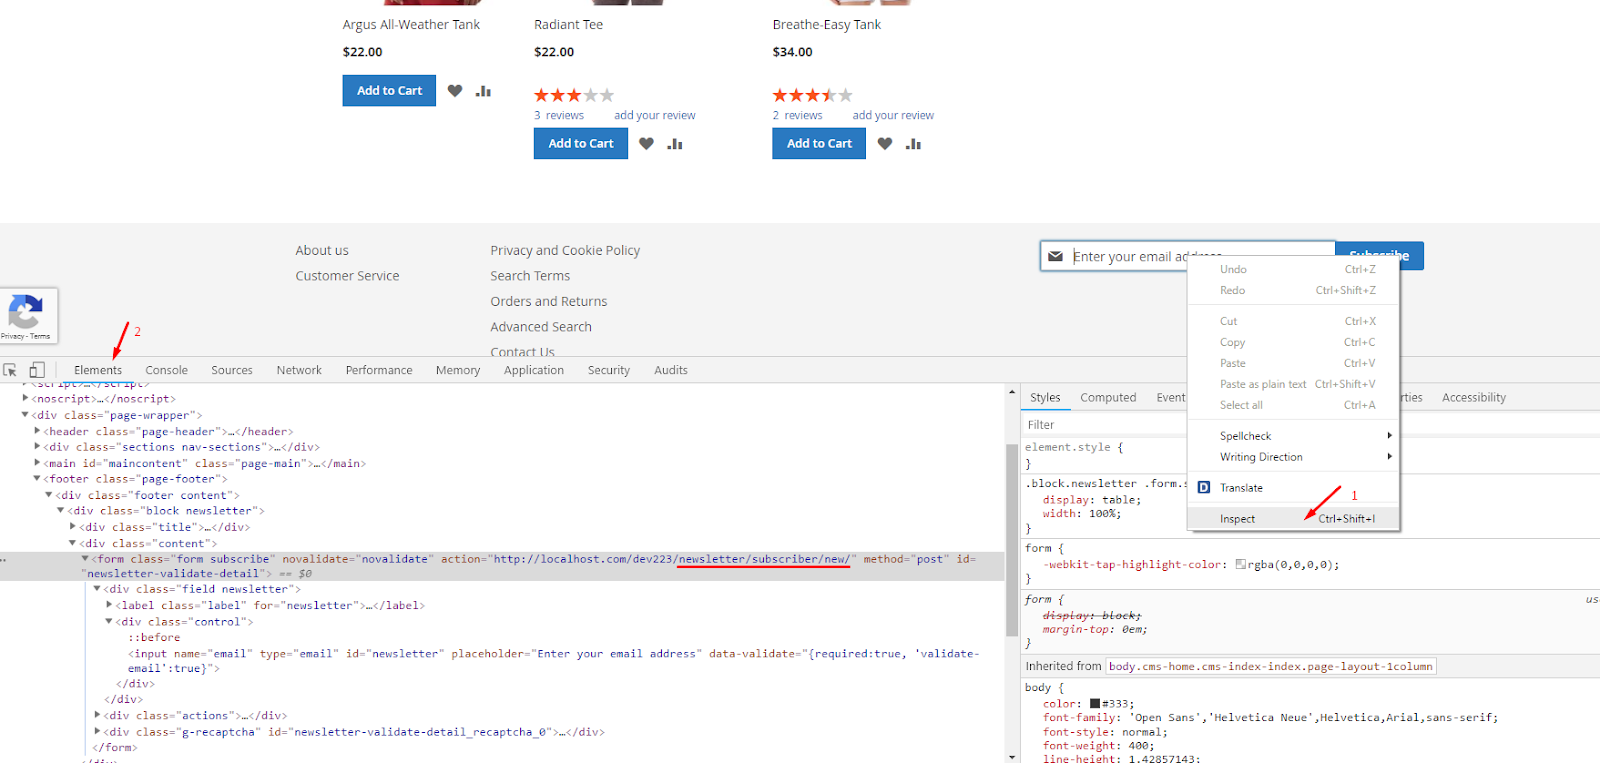
Step 4: In the Subscriber Form in the Action field, copy the URL path. (In this example, the URL is "newsletter/subscriber/new/")
Step 5: Paste the URL into the Form Post Paths field
The paths are separated by down stream.
If you this field is empty and you fill in the information in the CSS Selectors field, reCAPTCHA still displays on the form that you fill in the information CSS Selectors, but it doesn't still work on that form.

- CSS Selectors
- You need to take CSS Selector of the form. At our example, we will take ID of the form. For example: #newsletter-validate-detail, display reCAPTCHA in the Subscriber
- The IDs are separated by down stream.
- If you leave this field blank while filling in the information in Form Post Paths field, reCAPTCHA won't display on the form you want.
- You need to take CSS Selector of the form. At our example, we will take ID of the form. For example: #newsletter-validate-detail, display reCAPTCHA in the Subscriber
Note:
- In the Custom Form Position field, if you want to show reCAPTCHA on the form you want, you have to fill in all information of 2 fields: Form Post Paths and CSS Selectors.
- Using the invisible CAPTCHA system outside the frontend, most users won't see CAPTCHAs at all, not even the "I'm not a robot" checkbox. If you are flagged as "suspicious" by the system, then it will display the usual challenges. Hence, If you want to check it you can try to click the Create an Account button many times.
Need to download the library of Google Recaptcha so that when you run this extension, there's no error occur- When you cannot access to the admin panel while reCAPTCHA enables, you can use the following command to disable the module via composer as well as can access the admin page as usual.
php bin/magento module:disable Mageplaza_Recaptcha
Or you also disable the configuration by the command below:
php bin/magento mageplaza:core:disable Mageplaza_Recaptcha
Refer the guide to download the library
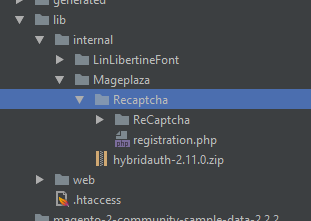
- Create the folder: lib/internal/Mageplaza
- Go to the path to download the library of Google Recaptcha here
- Extract
magento-2-google-recaptcha-library.zipintolib/internal/Mageplaza, then change the name of the file that you have just extracted,Recaptcha
- Run the following command to install:
php bin/magento setup:upgrade
The display of reCAPTCHA on the frontend
The display of reCAPTCHA in the backend

Command line
Run the following command to enable or disable google recaptcha display in the backend:
php bin/magento mpgooglerecaptcha:backend:enable
php bin/magento mpgooglerecaptcha:backend:disable
Reset Command line
- If store admins mistakenly enter their IP addresses in the Blacklist, this following command lines can be run first:
bin/magento security:reset blacklist
Next, run this command line:
bin/magento cache:flush
- After you have finished running those above command lines which reset the Blacklist(s) field, you will be able to access the admin page again. Note that the Blacklist(s) field is reset now so don’t forget to reenter the blacklist IPs.
- Similarly, the Whitelist(s) can be reset using these command lines:
bin/magento security:reset whitelist
bin/magento cache:flush
- When admin users want to access backend in the period of Away Mode suddenly, follow two command lines to turn Away Mode off.
bin/magento security:reset awaymode
bin/magento cache:flush
- If you run the command
bin/magento security:reset, both Blacklist(s), Whitelist(s) and Away Mode will be reset.